Using a satellite photo as the basis for a CAD forest garden plan is only 4 steps away
As part of my online forest garden course, I’ve been looking at how to use a screenshot of a satellite photo as the basis of a forest garden plan. If you’re comfortable with computers, the process is relatively straightforward.
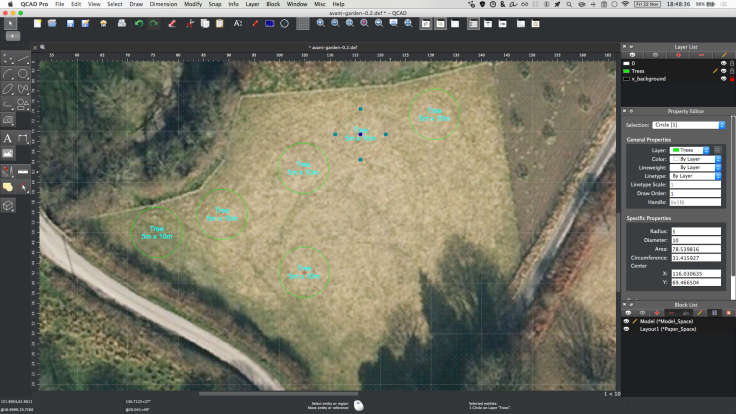
Using a CAD plan, it’s easy to move trees around to try out different ideas. The hard bit is setting up the boundaries of the land in the first place.
The easiest way I’ve found to achieve this is to take a screenshot of a satellite photo and scale it down to the right size in the CAD software.
This walkthrough will show you the 4 steps of importing and scaling the image.
What you need
- A copy of QCAD, Computer Aided Design software that is Free and Open Source. There’s a free version which is absolutely fine for our purposes. In the demo, we’re using metres as the unit!
- A bitmap editor like Photoshop. GIMP is a Free Open Source alternative.
1. Take a screenshot of your satellite image
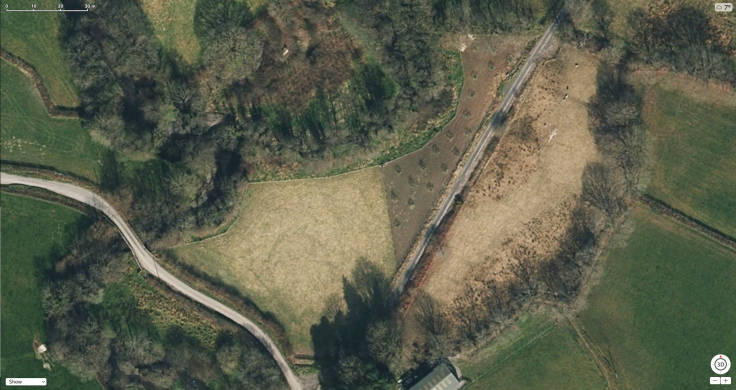
Satellite photo of land in Apple Maps
- Use Google Maps, Apple Maps or Bing Maps and get the highest resolution satellite image of your land that you can.
- Make sure to include a metres scale (this demo is in metric!)
- Take a screenshot
- Open in your image editor and save as a JPEG in the same folder you’ll save your CAD file.
2. Measure pixels per metre
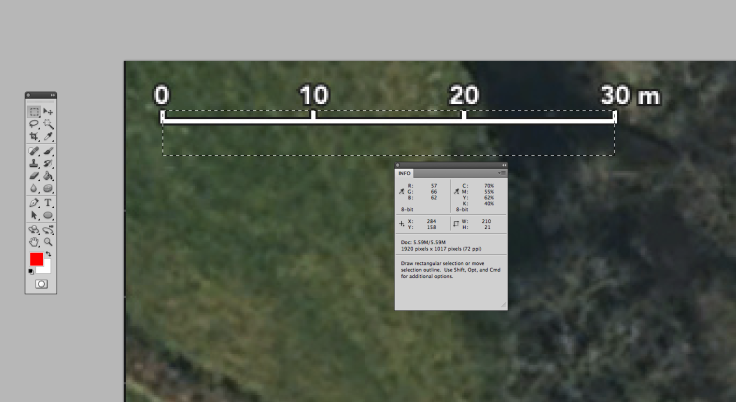
Rectangular marquee tool measuring the width of the scale
- Using the rectangular marquee tool and measure the metres scale.
- In our example, there are 210 pixels per 30 metres.
- 210 divided by 30 equals 7 pixels per metre
3. Calculate image scale factor
- QCAD imports images in at 1 pixel per 1 metre.
- In our example, we want 7 pixels per metre.
- So, we divide 1 by 7, which gives us 0.142857143
This is the image scale factor, ie how much we need to scale the image once it’s in QCAD.
4. Scale the image in QCAD
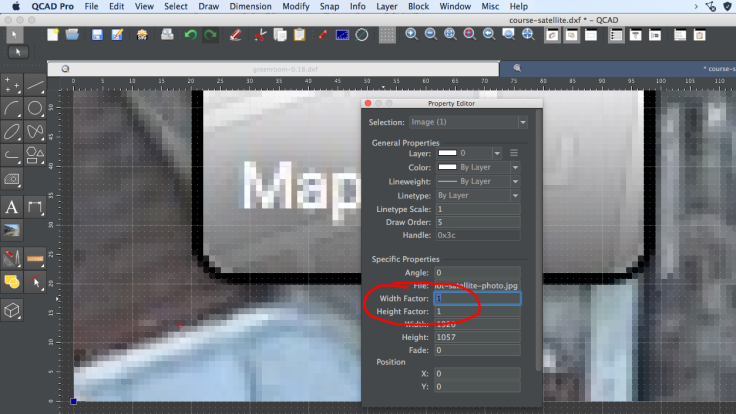
Enter the image scale factor into the Width and Height Factor field in the Property Editor
- Hop into QCAD, save a new file in the same folder as your background image
- Choose
File → Importfrom the drop-down menu, then import your image - Select your image with
Select → Select All - Bring up the Property Editor with
View → Property Editor - Enter the image scale factor (our example is 0.142857143) into both the
Width Factor:andHeight Factor:fields
You’ll see the image scale down. And now you can use the Circle tools to create circles of a set diameter, which will represent trees. You can find the approximate height and diameter of common forest garden trees and shrubs from the brilliant Plants For A Future.
If you found this tutorial helpful, please sign up to my newsletter for information about free forest garden mini-courses and resources.
I made a short, unedited video of this process which you can view here:
And the slideshow is online here:
www.forestgarden.wales/wildlife-forest-garden/plan
Happy forest gardening! 🌳 💚